BA4: Reflective Journal
Week 7
This was the week when I started to make the real thing, I was very nervous as the pattern cutting involved matching up all the tartan pieces with careful placement as the tartans had to match up.


So after all the pattern pieces were cut out, I got on working with producing the final collection taking certain elements from my inital designs and drawing out the technicals from them. I took the traditional elements from my initial designs, as well as my initial theme of Sherlock Holmes such as; the waistcoat, traditional British tailoring, as well as combining the military influence of Dr Watson with the military panel fastenings in one of the designs. I cleaned them up and added colour using Photoshop to add a more professional look - also I am better skilled at Photoshop!!!!


I then put all the fabrics i was using in the final garment into my sketchbook as well as fabircs I sourced when in London. For instance, I got two types of harris tweed just to see what they are and how they feel. I also looked at alternative lining material, but decided on the two toned blue-green lining as it reflected well with the Campbell of Loudoun tartan. The buttons were always going to be black to match with the bias binding, but I decided on the basketweave leather bound button as I thought the weave on the button fitted in with the crossing of the tartan. I also put in my idea of chain and leather but, have decided to get rid of this idea as it would make the final garment and collection too busy.
After updating my sketchbook with the images shown above as a sort of documentated record of the progress made through toiling and the making of my final garment, I got to work on my samples. The technical dossier comprises of a lot of samples, to show the reader exactly what is needed to make it.


I included the fabric samples again, but in the technical dossier and then showed the ones that were meant to be fused either for facing or reinforcement of the jacket. For both tartans I used the knitted black fusing and then canvas fusing for the collar so it would stand up on its own, but yet sill able to roll down for alternative looks. All the seams on my garment were just going to be pressed open seams as they were all hidden by the lining and the stitch tension stayed at 2.5cm for the whole garment.
I then went on to create samples for the design aesthetics of the final garment - the bias binding was quite simple as it was just a strip of fabric 6cm in length with 1cm seam allowance on each side. Therefore leaving a 2cm visible binding on each side when folded over the edge.
I did another bias binding sample but, with buttons to show the placement on the bias binding, with the buttonhole's length and how I plan on stitching the buttonhole from the binding into the facing - to add a little quirk to the style of tailoring.
Finally, the most difficult samples of all (and probably what I found the hardest when making the garment) the jett pocket. It was only difficult because of all the different tartans involved and how careful you must be to make sure the pocket facing lines with the pocket bag and where the jett pocket will appear on the main tartan. Fortunately, it turned out exactly as I wanted.


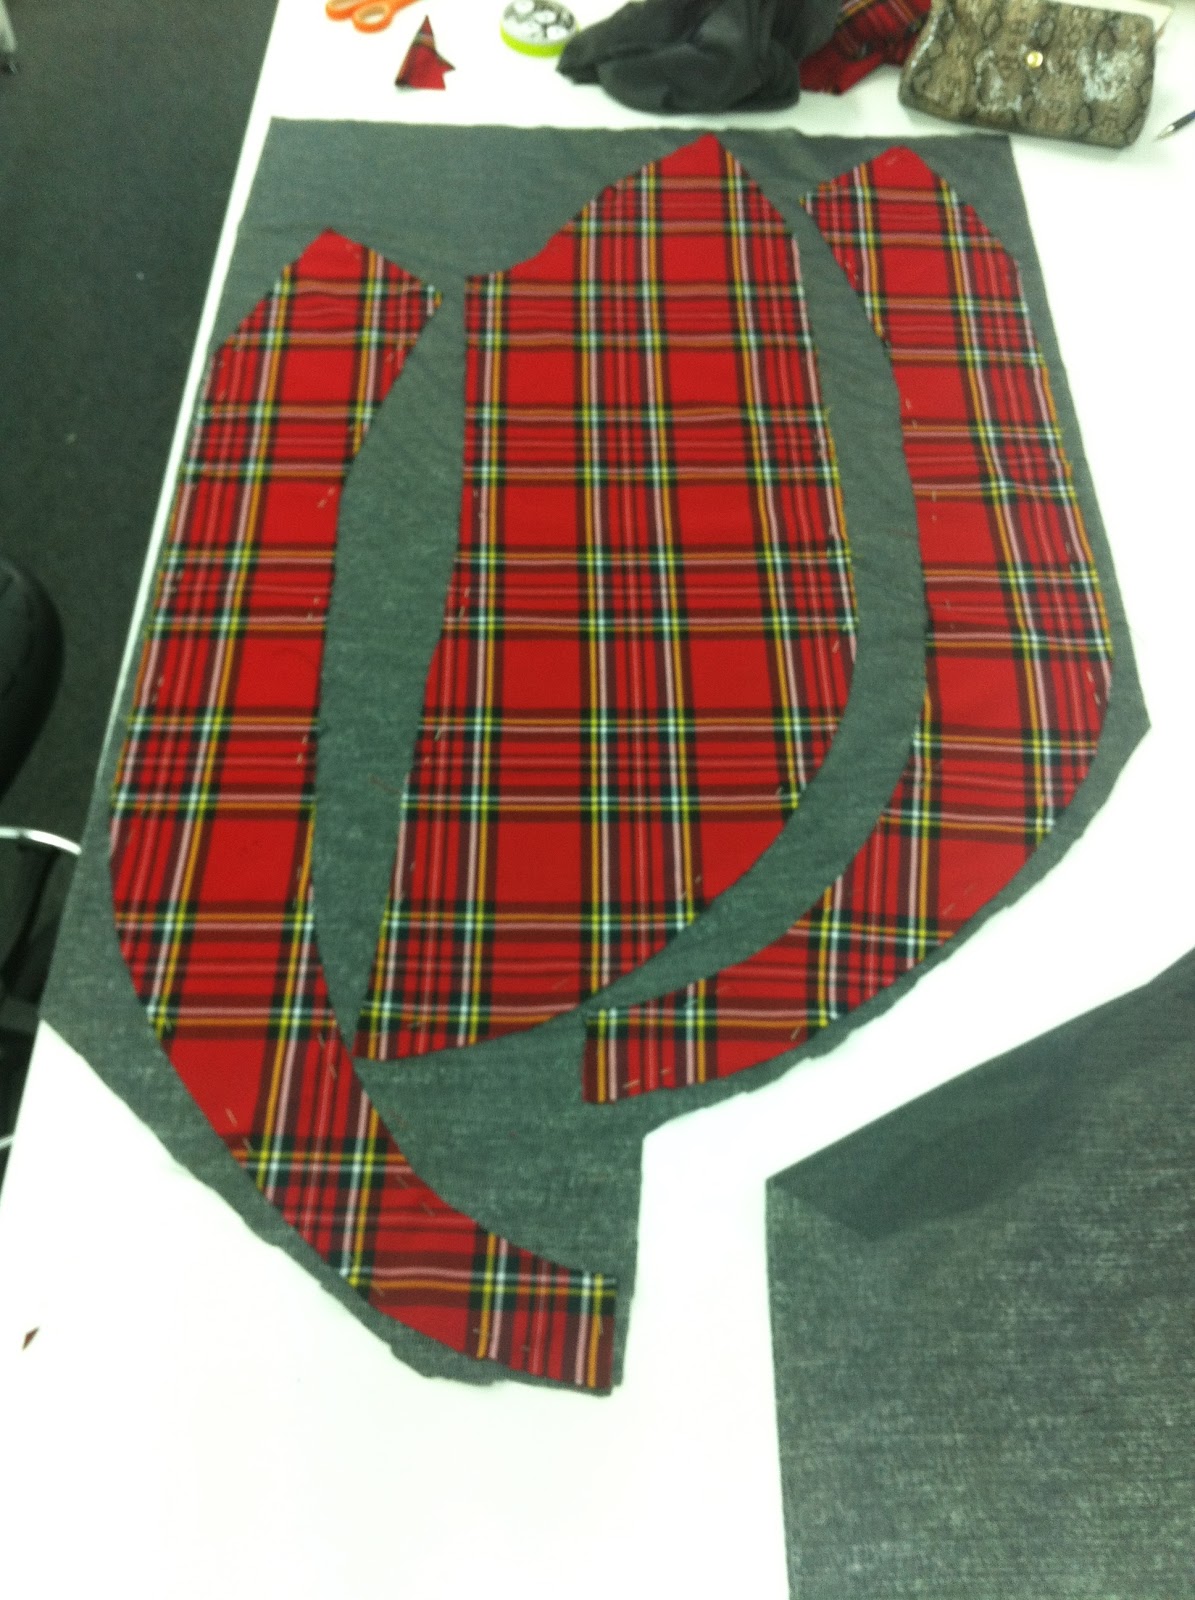


After careful placement with pins I achieved correctly cut pattern pieces with both tartans. The cape was the hardest, because before on the checked toile the dart at the back was slightly off with the running checks. Therefore, Laura suggested that I cut away the dart and only use the pattern piece as a semi circle. Then to layout the fabric on the bias, draw out one half by lining points of the flaps with corners of the sqaures and flip pattern and do the same thing with the other side - making sure that the back would meet up wen sewn together.The lining was a lot easier as it is one colour but, I still measured it when cutting it on the grain and on the bias for the cape lining.


So after all the pattern pieces were cut out, I got on working with producing the final collection taking certain elements from my inital designs and drawing out the technicals from them. I took the traditional elements from my initial designs, as well as my initial theme of Sherlock Holmes such as; the waistcoat, traditional British tailoring, as well as combining the military influence of Dr Watson with the military panel fastenings in one of the designs. I cleaned them up and added colour using Photoshop to add a more professional look - also I am better skilled at Photoshop!!!!


I then put all the fabrics i was using in the final garment into my sketchbook as well as fabircs I sourced when in London. For instance, I got two types of harris tweed just to see what they are and how they feel. I also looked at alternative lining material, but decided on the two toned blue-green lining as it reflected well with the Campbell of Loudoun tartan. The buttons were always going to be black to match with the bias binding, but I decided on the basketweave leather bound button as I thought the weave on the button fitted in with the crossing of the tartan. I also put in my idea of chain and leather but, have decided to get rid of this idea as it would make the final garment and collection too busy.
Technical Dossier Samples
After updating my sketchbook with the images shown above as a sort of documentated record of the progress made through toiling and the making of my final garment, I got to work on my samples. The technical dossier comprises of a lot of samples, to show the reader exactly what is needed to make it.


I included the fabric samples again, but in the technical dossier and then showed the ones that were meant to be fused either for facing or reinforcement of the jacket. For both tartans I used the knitted black fusing and then canvas fusing for the collar so it would stand up on its own, but yet sill able to roll down for alternative looks. All the seams on my garment were just going to be pressed open seams as they were all hidden by the lining and the stitch tension stayed at 2.5cm for the whole garment.
I then went on to create samples for the design aesthetics of the final garment - the bias binding was quite simple as it was just a strip of fabric 6cm in length with 1cm seam allowance on each side. Therefore leaving a 2cm visible binding on each side when folded over the edge.
I did another bias binding sample but, with buttons to show the placement on the bias binding, with the buttonhole's length and how I plan on stitching the buttonhole from the binding into the facing - to add a little quirk to the style of tailoring.
Finally, the most difficult samples of all (and probably what I found the hardest when making the garment) the jett pocket. It was only difficult because of all the different tartans involved and how careful you must be to make sure the pocket facing lines with the pocket bag and where the jett pocket will appear on the main tartan. Fortunately, it turned out exactly as I wanted.
No comments:
Post a Comment